
Understanding trace and recognizing the different stages of the saponification process is essential to your success as a soap maker. It will ensure your soap is well-mixed and safe to use and allow you to move on to advanced soapmaking techniques.
Once you have a few basic soap batches under your belt, "trace" is a term you will likely have come across when reading soap recipes. Learning to identify it accurately isn't just about mastering beautiful swirls; it is your best tool for knowing whether your soap-making process is going smoothly or if you've hit a temporary hiccup.
Why is it called trace?
Trace in soapmaking refers to the mixing process when lye molecules meet fatty acid molecules to make new soap molecules.
It gets its name from a simple test: when the batter thickens, you can drizzle a bit of it from your immersion blender across the surface and literally "trace" a line or your name. Depending on your batter's thickness, these trails will behave differently. At a light trace, the faint lines disappear after just a second or two. At a thick trace, the trails will hold their shape completely without sinking back into the pot.
How quickly does trace happen?
While how fast trace happens depends on a few different variables (more on that below), a rough guideline for a standard 3-pound batch is about 45 to 60 seconds of stick blending.
If your batter seems to thicken up much faster than that, you might be dealing with "false trace." This happens when a cool lye water solution is poured into melted base oils that have a high melting point (like cocoa butter). Upon contact with the cooler temperature, these solid oils quickly harden up again, making it look like your batter has successfully thickened.
If you pour a false-traced mixture into your mold, it will separate pretty quickly. To fix it, simply keep blending until the heat from the friction melts those oils back down and everything becomes evenly emulsified.
Stages of Trace
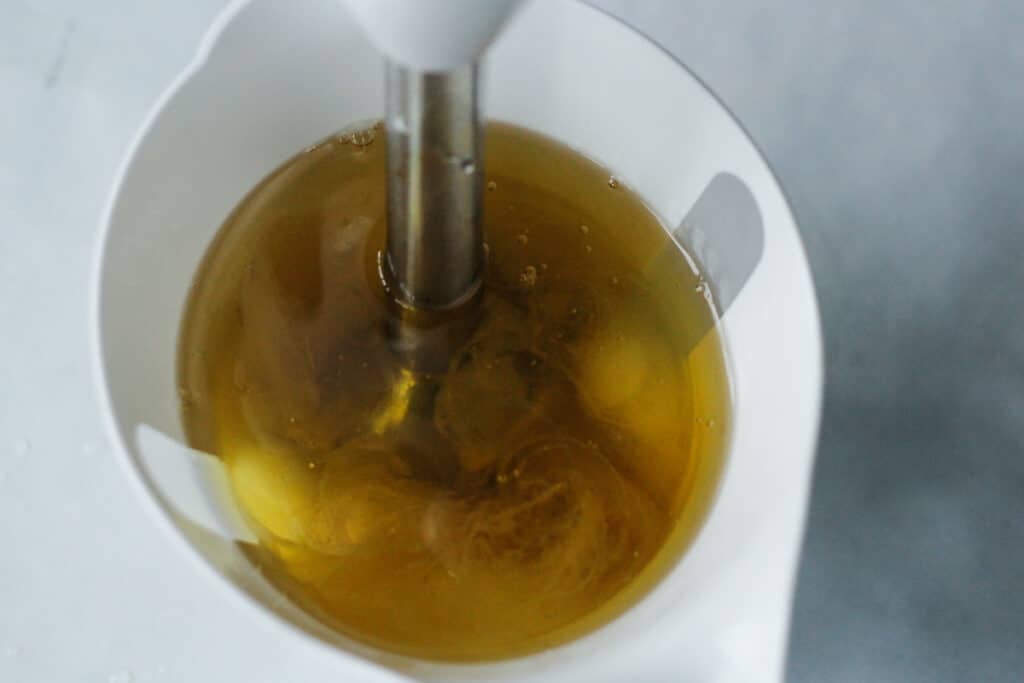
1. Emulsification
When the lye solution is first poured into oils, it will sink to the bottom and form a murky layer. The top will still be liquid oils. Turn on your stick blender, and you will still see streaks of oil floating on top of the mixture. If you were to pour your soap into a mold right then, it would separate into a layer of liquid oil on top and a lumpy, lye-heavy soap on the bottom.
The most important step in this mixing process is to achieve a stable emulsion. The soap batter will look uniformly creamy throughout, and no more oil streaks are visible.
For soap makers, this is the stage that is the most important to identify. When the soap batter has emulsified, the consistency is still liquid and hasn't started to thicken yet. But most importantly, you could pour it into a mold and be done.
It is also the ideal time to separate and color your soap batch. If you find that it is still too liquid after adding colorants, you can always stick-blend more. Remember, once the batter starts to thicken, you can't undo it.
2. Light / Thin Trace
This thin liquid consistency is achieved very shortly after the soap batter has emulsified. Trails on the top are barely noticeable, and the batter is still watery. This is the point of no return, so to speak, the moment when soap will progressively become thicker and eventually solidify.
Thin trace is perfect for making wispy swirls.

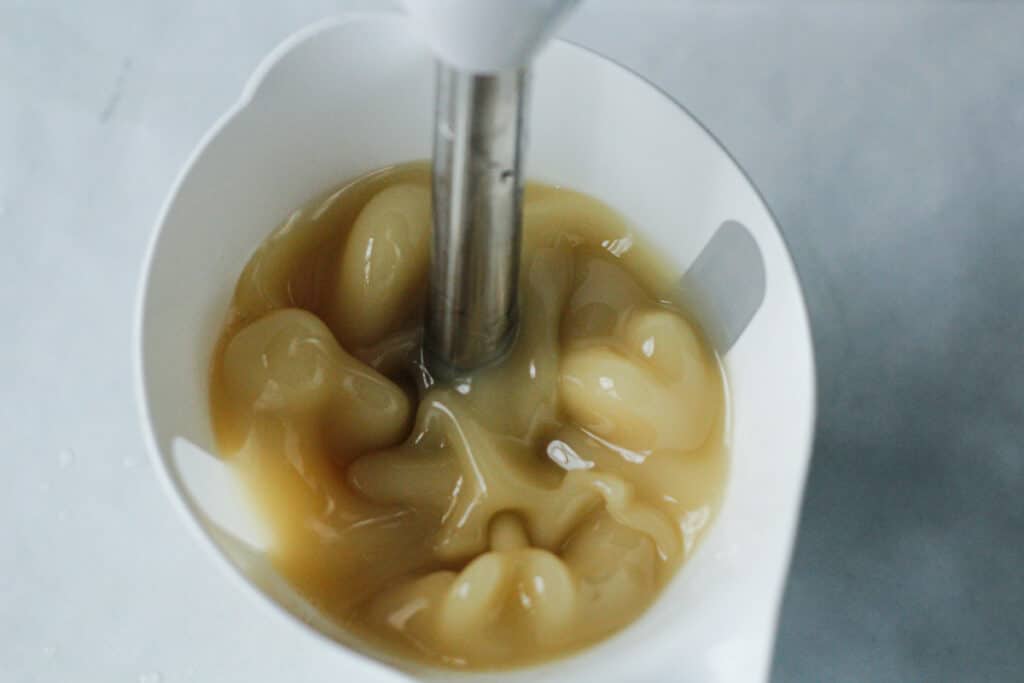
3. Medium Trace
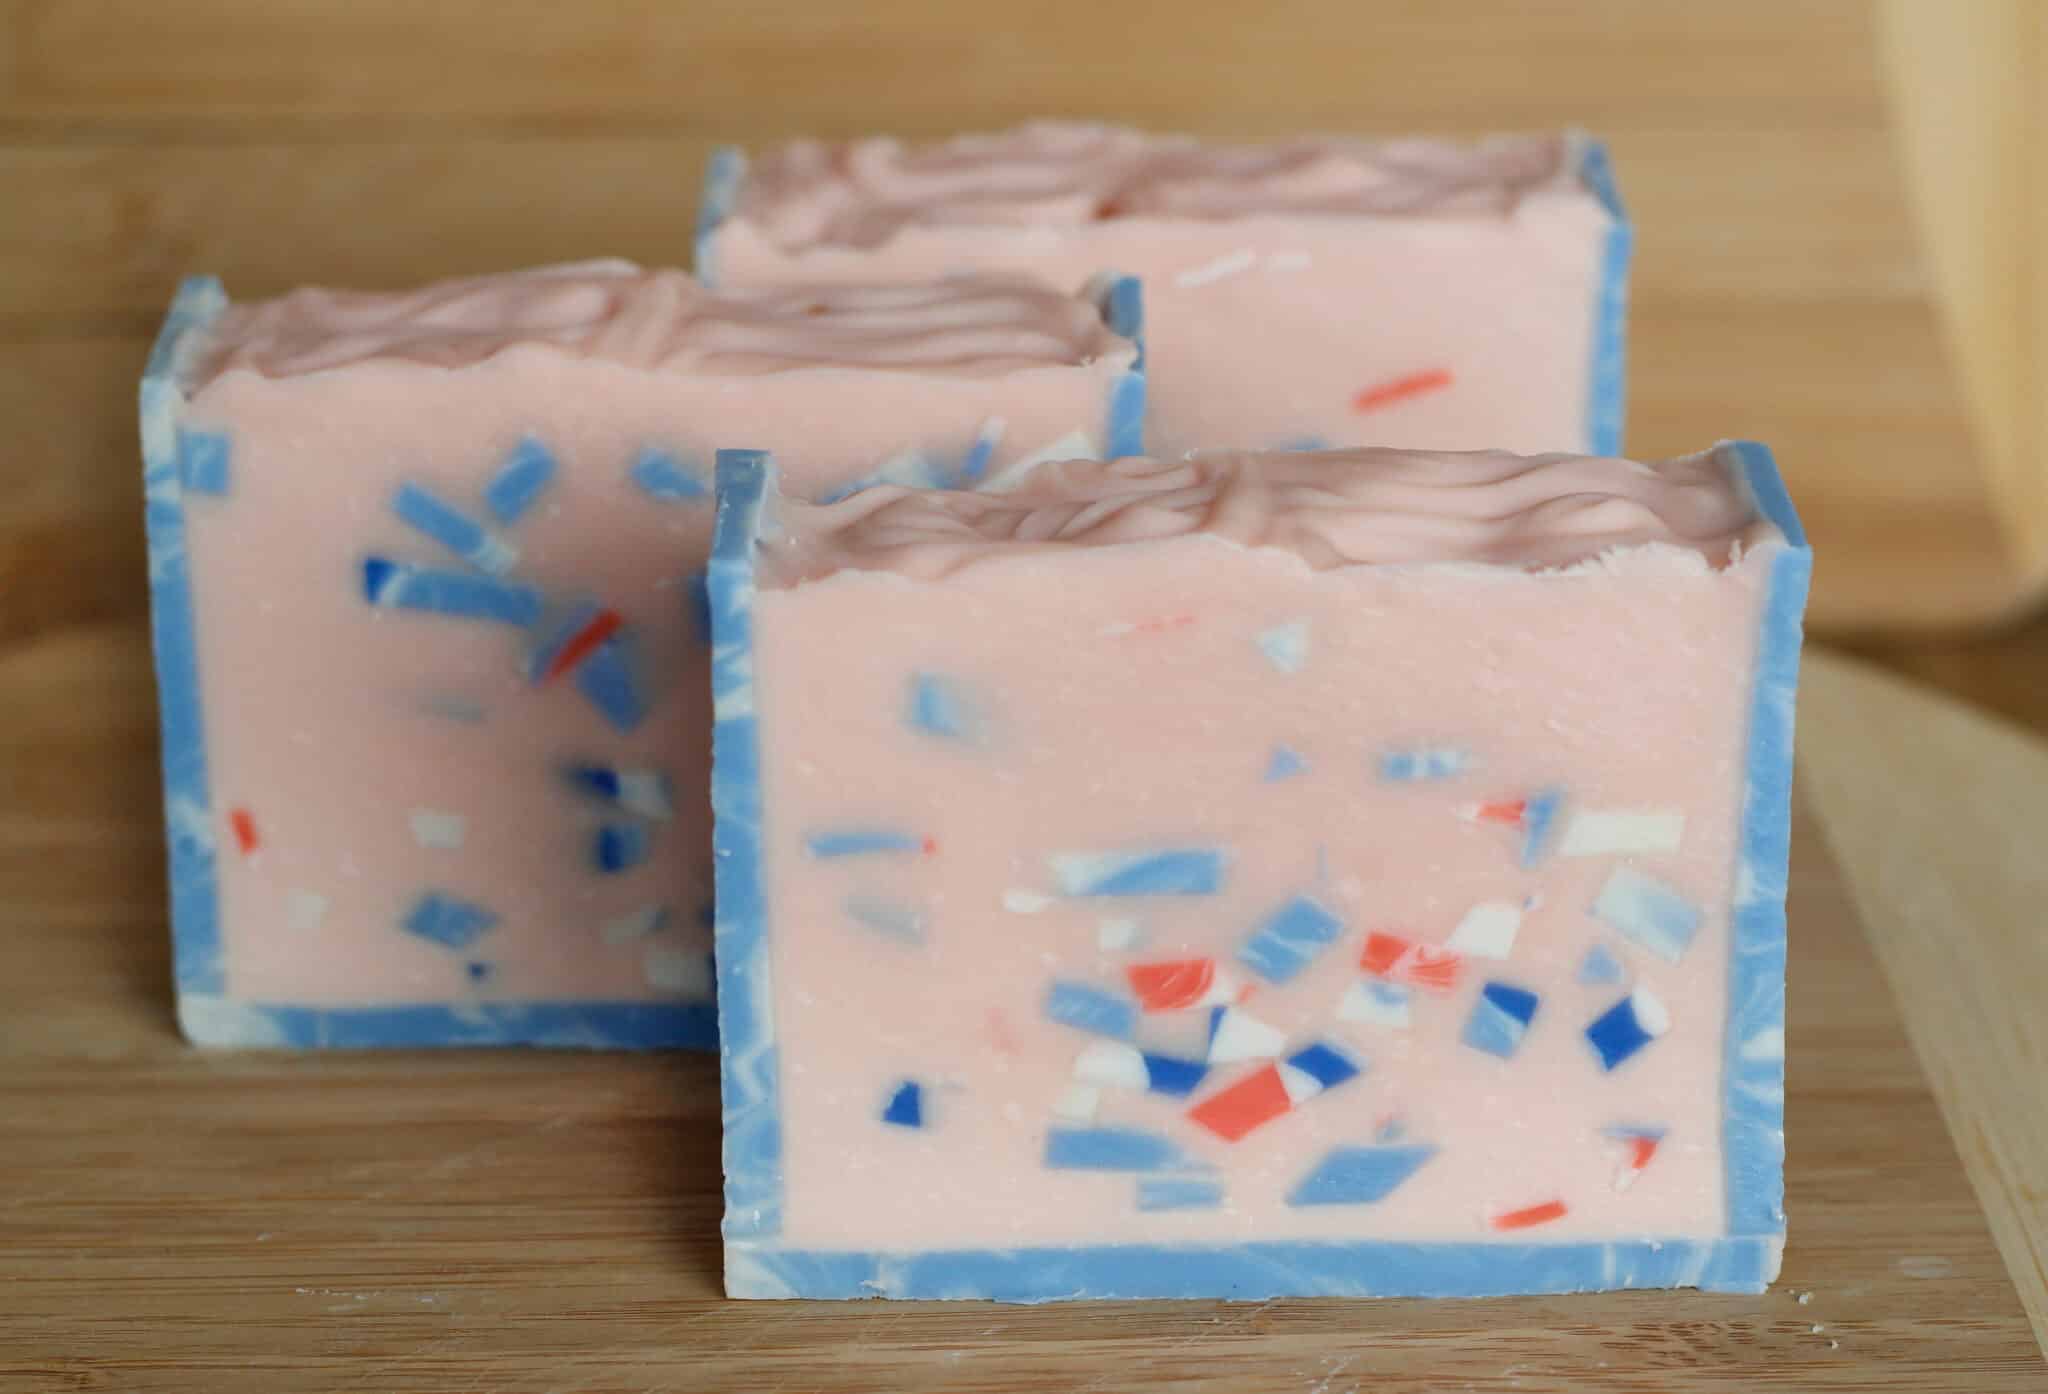
Now, with the batter being more of a pudding consistency, it is easy to leave trails on top of the soap. This is a great time to add additives like poppy seeds, dried flowers or soap "Confetti". They will stay suspended in the batter without sinking to the bottom.
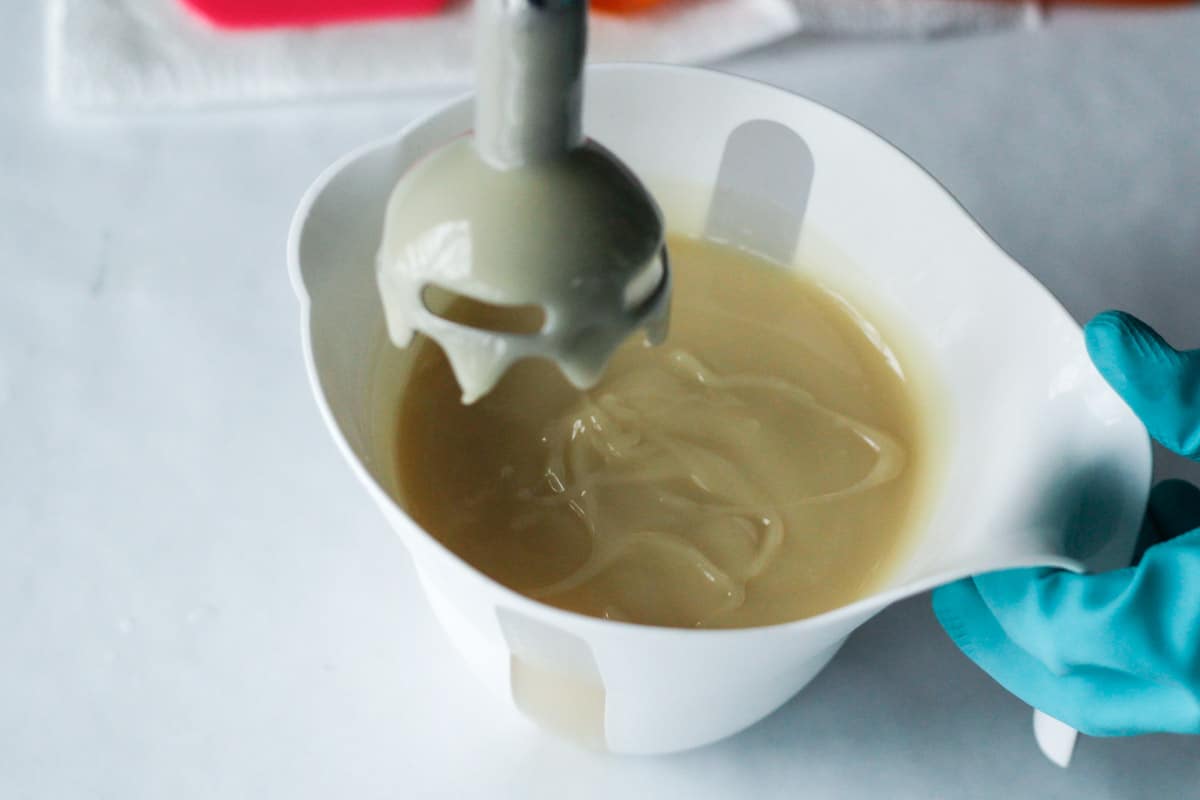
4. Thick Trace
Thick trace resembles thick cake batter and is hard to pour;; you're better off scooping the batter into a mold with a spoon.
Thick trace is great for layered designs, textured tops, and is essential for piping. It also tends to be less prone to soda ash forming, will reach gel phase faster, and will be easier to unmold.


How to Slow Down Trace
1. Temperature - soaping at room temperature or cooler temperatures (90-100℉) will slow down trace and give you more time to work
2. Water content - depending on how much water you're using will determine how quickly your soap batter "moves" (find out more about water discount). For a fluid, workable soap batter, aim for a 30-33% lye concentration.
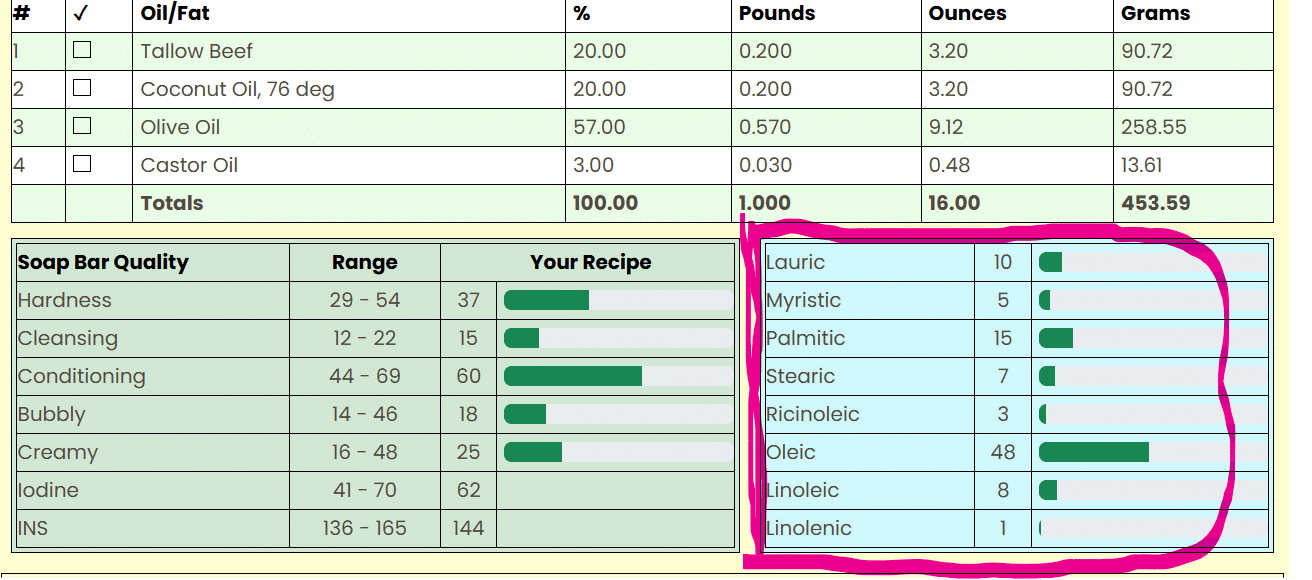
3. Fatty Acid profile - soap recipes that have a high amount of unsaturated fats trace slower than solid oils. The exception being castor oil, a liquid, that can accelerate trace if use in high amounts.
You can judge whether a batter will be fast-moving or not simply by looking at the fatty acid profile in SoapCalc. You want the amount of unsaturated fats to be higher than that of saturated ones. Look for a recipe that is low in Lauric, Myristic, Palmitic, Stearic, and Ricinoleic fatty acids.
4. Mixing technique - when aiming for emulsion or light trace, use your stick blender sparingly, alternating between short bursts and stirs of the stick blender. I sometimes like to start my batter off with bursts of stick blending and then move to whisking.
5. Use of catalysts - certain fragrance oils and essential oils (like cinnamon, clove, vanilla and florals), clays, and titanium dioxide can accelerate trace.
Here's a short clip that demonstrates how titanium dioxide can thicken soap batter:


Christina says
Thank you for this info I just jumped into making cold process and seriously almost every batch so far I was assuming that I blended it too thick, air bubbles etc. I trying a new batch this weekend and will be doing some color layering so I’m going to try not to over mix it....
Celine says
Hi Christina,
I hope your next batch turns out better. Good luck!
Walter says
My lyre refused to mix with the oil and was simply floating on the oil. I watched in disbelief. Later on I got some hard brittle brick aquater of what I invested. Oops. But the colour also changed from green to orange so every thing is wrong. Help.
Celine says
Tough to say what went wrong. Maybe your measurements where incorrect? Sounds like you used too much lye.
Makeda Jardine says
Very informative for those of us that just started our soaping journey.
Celine says
Glad you found it interesting