

Working with Tricky Fragrances
If you’ve never worked with a particular fragrance before, I suggest you check if the supplier states any issues you might encounter and read ALL the reviews to check for any mentions of:
Acceleration: This is when the soap batter moves to a very thick consistency at lightning speed making it hard to work in colors and/or do intricate swirls. Fragrance oils and essential oils that are most notorious for doing that are florals, spices (like clove for example) and sometimes ozones (fragrances that mimic the scent of the ocean). This isn't necessarily a red flag, if you have a few batches under your belt you can attempt to work with such a fragrance. Simply be prepared that the batter might move fast and adjust your design plan accordingly. Good choices in this case are a solid color or a layered soap.
Some other things that can help with acceleration are:
- Soap at lower temps (below 100º F, preferably even room temp)
- Use a lye concentration of 33 (the lower the water content the faster the soap will move)
- Disperse the fragrance oil in your base oils first before mixing in the lye. This has two advantages: a) you won’t have to worry about mixing it in if your batter gets pretty thick b) the fragrance oil is then diluted in plenty of oil which will make it more workable
- DON’T overdue the stick blending (stick blend until oils and lye barely come together and then move to stirring by hand using a spatula or whisk)
Ricing: This is what happens when the fragrance oil binds to some of the base oils. The consistency really looks like rice pudding. The solution is to simply stick blend until the batter appears smooth again. The drawback to that though is that you might end up with a super thick batter from all the stick blending.
Seizing: It’s acceleration on steroids. Some folks refer to it as “soap on a stick”. The batter turns into a thick, gloppy, clay like mess that is hard to move into your mold and hard to get of your stick blender. No fun.
Discoloration: This happens mainly with fragrance oils that contain vanillin - often found in bakery scents. Discoloration can range from a light tan to a dark brown almost black color. Most suppliers will state whether a fragrance discolors on their website.
If you plan discoloration into your design, you can create beautiful soaps. My go-to method when I’m working with a fragrance that discolors is to separate the batch into a small part, a little bigger part and an even bigger part. I keep the fragrance oil out of the smallest part and add titanium dioxide (TD) to it. To the medium part I add some of the FO and a little of TD and to the big part I add all the rest of the FO. Then I swirl all three parts together and get a cool tricolor effect.
Gelling your soap will also intensify discoloration, and to combat this you can pop your soap in the fridge after you pour.
Desceleration: It means the soap will actually set up more slooowly. Awesome, right? It’s just something that’s good to know, so you’re not alarmed and think something is wrong with your soap.
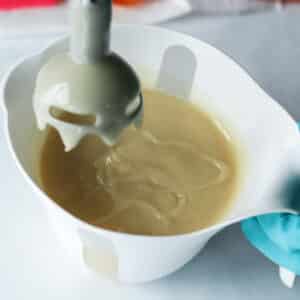
After you’ve done your research it’s always a good idea to do a small test run. That’s what I’m doing here. I’m testing 4 different fragrance oils and I will take you along for the ride. Of course, I’m sharing my recipe and all the colors and fragrances I used.
When I’m planning to do a bunch of batches in the near future, I like to weigh out my oils all at once and prep my lye solutions ahead of time. That way on soaping day I can just grab the two and let the fun begin.
Some call this process multi-batching, some master-batching – I’m not entirely sure what the difference is.
I gather that master-batching is something that is typically used in big scale productions. It involves measuring out oils for multiple batches and then melting them in one giant pot. Out of this giant pot the soaper then takes out only the amount of oils she needs for the particular batch she’s making. The rest of the oils stays in the pot for future batches. This saves her a whole lot of time, because she doesn't have to weigh every single oil out for each batch individually. The lye solution can be master-batched as well.
I’m going to call what I do multi-batching since it’s on a much smaller scale. I find this process super useful for small batches - even very small batches. It’s really pretty simple, you just need to make sure you calculate all the amounts correctly. So, here’s what I do: I triple or even quadruple my recipe and weigh all of my oils into one big pot. After they’re all melted and combined, I pour the exact amounts of oils needed for the different batches into separate containers. Then, I go ahead and measure my water and lye individually for each batch.


If you’ve read my article Soap Equipment I Wish I Hadn’t Bought you know that I’m a big fan of small batches. Today I’m doing 4 super small loafs (1 lb each) and you’ll see you can do all the cool fancy swirls just as well. But besides knocking myself out doing fun swirls and using many different colors, my main goal was to test different fragrances I hadn’t worked with before.

If you want to watch me make all 4 soaps, here's the video for you:
This post contains affiliate links, meaning I will earn a commission if you decide to click through and make a purchase.
If you're new to cold process soap making, I suggest you check out my articles on lye safety, equipment needed and my beginner tutorial.
As I mentioned earlier I will measure and melt all my oils at once and then later separate the amounts I need for the 4 batches.
So, here is the recipe for a total of 1520 g/ 53.6 oz. (4 x 380g/ 13.4 oz.) of oils (you can resize this recipe to your heart’s desire using soapcalc):
- Soybean oil (hydrogenated): 577g / 21.4 oz. (38%)
- Coconut oil: 426g / 15.5 oz. (28%)
- Sweet almond oil: 258g / 8.4 oz. (17%)
- Pomace (olive oil): 106g / 3.2 oz. (7%)
- Cocoa Butter: 76g / 2.7 oz. (5%)
- Castor oil: 76g / 2.7 oz. (5%)
As of now I don’t multi-batch my lye solution, but I do weigh and mix it individually for separate batches ahead of time. You can keep your solution stored somewhere safe and properly labelled for up to one week. The amounts shown below are for ONE batch of 380g / 13.4 oz. of oils. I prepped four of them in little food containers:
- Distilled water: 99g / 3.5 oz. (38% lye solution)
- Lye: 53g / 1.9 oz.
- Sodium lactate: 1 teaspoon added to warm (below 130 ) lye solution
Molds: I'm using the small silicone molds from Brambleberry
Let’s start with the different soaps:
Coconut Lime Verbena:
Colorants used:
- ⅓ teaspoon green chrome oxide (Brambleberry)
- ⅓ teaspoon fizzy lemonade oxide (BB)
- ½ teaspoon Titanium dioxide
Fragrance: 10 ml Coconut Lime Verbena (Majestic Mountain Sage)
Directions (this will be the same for all 4 batches):
- Prep all your colors by dispersing them in a little bit of oil using a milk frother
- Add fragrance oil to your oils
- Carefully add lye solution to oils (I soaped with my oils and lye at around 80)
- Blend until light – medium trace is achieved
- Split batch into 3 parts: 2 small parts each 150g and one part the remainder of the batter
- Mix colors into the small parts and titanium dioxide into the bigger part
- Now, you can get creative: you can do a drop swirl, hangerswirl, in-the-pot swirl etc. Make sure you leave a little batter for the top
- Cover the top with white batter and smooth it out
- Deck out the top with whatever technique tickles your fancy
- Let sit in mold for 36 hours, release and cure
Mona Lisa
Colorants used:
- ¼ teaspoon merlot sparkle mica (BB)
- ¼ teaspoon ultramarine pink oxide (BB)
- ½ teaspoon titanium dioxide
Fragrance: 8ml Mona Lisa Fragrance Oil (Majestic Mountain Sage)
Directions: see above
Yuzu
Colorants used:
- ⅓ teaspoon fizzy lemonade oxide (BB)
- ⅓ teaspoon tangerine wow! oxide
- ½ teaspoon titanium dioxide
Fragrance: 23g Yuzu Fragrance Oil (BB)
Directions : see above
Sea Salt
Colorants used :
- ¼ teaspoon hydrated chrome green oxide (BB)
- ¼ teaspoon ultramarine blue oxide (BB)
- ½ tsp titanium dioxide
Fragrance: 8.5 ml Sea Salt Fragrance Oil ( MMS)
Directions: see above
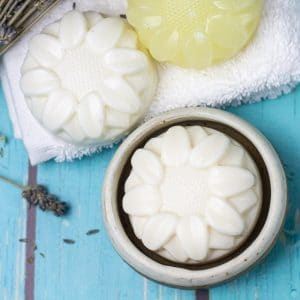
The Results Are In
I have to say that all the fragrances performed really well. None of them accelerated, and only the Mona Lisa Fragrance Oil discolored a tad bit to a light beige after the soap gelled.
Want daily soapy tips and tricks? Follow me on instagram where I share helpful pointers on everything handmade bath and body. Over on facebook I share helpful and relevant articles that I come across on my soapy journey. I try to post daily, but you know how that goes 😉
Until next time. Happy Tinkering!


MsBarb says
Ohhhh! I want some of that yellow!
I love how you described the various issues common with using fragrance oils. I also love your idea of multi batching! Brilliant idea that I might be stealing in the future!
Celine says
Thank you!
I oftentimes have problems incorporating oxides (they often clump on me) but this yellow great. Yes, please do use multi-batching, it Safes a whole lot of time😉
Lovedales says
Great . I will love to know more about soap making. Maybe take it as a profession. I love it. Thank you 🙏
Celine says
Glad to hear 🙂