

Most of my soapy inspiration comes from things that aren't soap related at all: nature, vacations aaaand, of course, deserts. Seriously, if I wasn't piping soap I would pipe and eat buttercream all day - not good.
I first saw these adorable blossom macarons (edible ones) made by an incredible baker by the name of Ayse Yaman Butik Pasta on Instagram. She has created a real craze among bakers and I knew when I saw her creations that I needed to give these a try using cold process soap. Easier said than done as it turned out.
First hurdle: Finding a mold. Not as easy as you think. I scoured the internet, took measurements of real macarons, tried out round shaped molds and finally settled on this one. I wish I had bought two since you can only make 3 macarons at a time.

Second hurdle: The right recipe and consistency for piping the roses. These little roses basically have to be able to stand upright. With a flower that is more “laying” flat you can get away with softer consistency but here your batter needs to be fairly stiff. I also found out the hard way that a recipe that has a lot of soft oils (oils that are liquid at room temperature) takes foooreva to reach the right consistency and then once piped leads to a bunch of soggy rose puddles.
If you have a tried and true piping recipe that works for you, please go ahead and use that one. I'm still on the quest for the perfect piping concoction, but for now I have found one that works well.
Third hurdle: Piping the roses. It really takes practice, practice, practice. So don’t be discouraged if at first they don’t come out perfect. The key here is that you want them to be as uniform in height or diameter as possible. When you assemble your macaron later, you want to have a nice even plateau to rest the other macaron half on - otherwise you'll end up with a lopsided macaron.
The other thing is that you don't want your roses to be too big. If they take up too much space your macaron will end up looking like an overstuffed sandwich - the proportions won't be right.
To keep the roses uniform and small I like to draw a little circle on the underside of the freezer paper using the outline of a eye glass repair kit.
Fourth hurdle: Patience. When it comes to soap, patience is really not my strong suit. I want to whip up a batch pour it and be done. This project takes 2 days to complete, which in my opinion is already pushing it. But the hardest part is to wait until the piping batter reaches the right consistency. It can in some cases take hours...
Watch me make blossom soap macarons here, you will have an easier time understanding the written part after watching this little clip:
So, ready to make some beautiful blossom macarons? Let’s dive in, shall we?
If you've never made cold process soap before, I suggest you read my post on lye safety and try making my beginner's soap first before attempting this technique.
This post contains affiliate links, meaning at no additional cost to you will I earn a commission if you decide to click through and make a purchase.
Special equipment needed other than standard soaping equipment:
- Macaron soap mold
- piping tip no.101 (for the roses)
- piping tip no. 2A (for the filling)
- disposable piping tips
- flower nail
- freezer paper
- Optional: eyeglass repair kit or similar round object
- Optional: funnel pitcher (these are very handy when pouring soap into a small mold)
Recipe (since this projects takes two steps I have broken down the recipe in two parts, feel free to prep all your oils needed using multi-batching):
For 6 macaron halves and roses (8 oz/ 230 g of soap, 6% superfat, 38% lye concentration):
- Coconut oil (45%): 2.6 oz./ 73 g
- Canola oil (30%): 1.7 oz./ 49 g
- Shea butter (20%): 1.2 oz./ 33 g
- Castor oil (5%): 0.3 oz./ 8 g
Additives, fragrance and lye:
- Distilled water: 1.4 oz./ 38 g
- Lye: 0.8 oz./ 24 g
- Patchouli essential oil: 2 g
- Lavender essential oil: 4 g
- Violet Petal Mica: ½ tsp
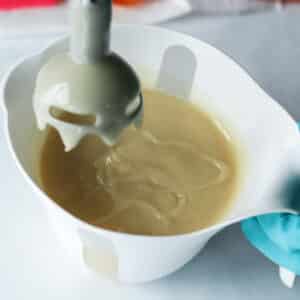
Filling: You will need a small amount of soap. Use a small measuring cup or a disposable coffee cup to whip it up. Make sure the bell of your stick blender is fully immersed. You could also use leftover soap batter from another project, just make sure it's the same colors as your roses.
- Coconut oil (45%): 1.6 oz./ 45 g
- Canola oil (30%): 1 oz./30 g
- Shea butter (20%): 0.7 oz./ 20 g
- Castor oil (5%): 0.2 oz./ 5 g
Additives and Lye:
- Distilled Water: 0.8 oz./ 24 g
- Lye: 0.5 oz./ 14g
- Patchouli essential oil: 1g
- Lavender essential oil: 2g
Instructions:
a) Macaron halves and piped roses:
- Measure and mix your oils and lye water until you reach a light trace.
- Divide your batter into two portions: the bigger one will hold 160g the smaller one 70g.
- Using a whisk mix your colorant and FO into the bigger portion, DON'T mix any color or FO into the portion that will be piped into roses.
- Carefully pour the purple batter into the mold.
- Use the straight side of your spatula to even out the top surface.
- Cover macaron soap with plastic wrap and set aside for 24 - 36 hours or place in the oven at low heat for a few hours if you wish to gell your soap.
- Prepare your piping bag by cutting off the tip and inserting the 101 piping tip (I found that the batter has a tendency to squeeze out the side so I like to use tape to seal off the gap between piping tip and the bag).
- Prepare your freezer paper by cutting it in 1 Inch squares. Optional: I’m a pretty novice rose piper, so in order to keep my roses as uniform as possible, I like to draw a round circle on the underside of the freezer paper. I found that a eyeglass repair kit works great for that.
- Once your batter has a very thick consistency you can start to scrape it off the bowl and place it in a piping bag. It’s very important to get the consistency right here. If your batter is not thick enough the roses won’t stay nice and crisp but will “melt” once they’re piped. It is not enough if your batter holds a peak, it really needs to be more paste-like in order to give you good results.
- Use a little bit of tape to secure the freezer paper on your flower nail.
- Twist the piping bag so that you can wrap it around your finger.
- Hold the bag so that the wider side of the piping tip is on the bottom.
- Start piping the rose by making a little bud - first going in a round cirlce, then pipe a small petal, then another slightly bigger one and so on. I find that 5 petals usually will give me a good size rose. Try experimenting on how you hold the end of the piping tip: vertical will give you a more closed look, more on an angle will give you a more open look.
- When you've piped around 30 roses that you're happy with set them aside to dry for 24 - 36 hours
b) Piping the filling and assembling the macarons (do this the following day):
- Stick blend your oils and lye solution until thick trace is achieved.
- Prepare your piping bag and insert the 2A tip.
- Place your soap into the piping bag, and starting in the middle of a macaron half, start piping a round dollop big enough so that the roses will stick to it - it doesn't have to be very high for now.
- Place the roses on the macaron half in a circle making sure they're fairly uniform in height.
- When you're done with the rose circle, top off the filling using your piping bag, and stick the second macaron half on top.
- Let your macarons cure for 4 weeks before use.
- Voila!
Below are some images of other projects where I used this technique. Let your creativity run wild and have fun 🙂
Until next time. Happy Tinkering!


Leave a Reply